Cards For Sale

Saturday, October 31, 2020

Creative Challenge Boo Box

 
Happy Saturday Peeps!!
 
It is day 6 of Halloween week on the blog and ALSO Creative Challenge Saturday with 
my good friend Wendy from WeeBeeStampin4Fun.
 
I love Vintage Halloween items, really all vintage items. I do collect a lot of vintage Christmas and Halloween items and when I saw a photo of some vintage pumpkins I thought I would try and recreate one.
 
This is what my pumpkin started out looking like:
 

I had several of these in my Fall decoration boxes and pulled a couple out to use, I got these 
at Dollar Tree or possible Target Dollar Spot, not 100% sure as I have had them for a few years, but any stryofoam type pumpkin would work. 
 
I painted mine using some acrylic paint and then made the face, eyes and nose, with black card stock.
I hand cut them and glued to the pumpkin. I drew in the mouth and eyebrows using my journaling pen and added some blush to the cheeks with a sponge dauber and Flirty Flaming ink. I used a white gel pen to draw in his eyes.

 
I made his hat with some DSP from Magic in the Night paper pack. I cut out an 8 inch circle and then cut it in half and rolled it into the cone shape.
I used hot glue to glue his hat to the pumpkin.
I added some Metallic Mesh Ribbon around the base of the hat and die cut a couple of stars using the Glitter Black paper for the top of the hat. I also die cut a couple of black bats to add to his hat as well.
 
 
 I made a Rosette to add under the pumpkin for his collar.
I used DSP from the Plaid Tidings for this.
For the Rosette I cut four strips 1-1/2 inches wide and scored at 1/2 across the strip.
I joined these strips together with tear tape and formed the circle for the rosette.

 
The box is a 3-1/2 inch square made with Basic Black card stock.
I added the plaid DSP, from the Plaid Tidings pack, that is matted with Pumpkin Pie card stock.
I used the Playful Alphabet Dies for the Boo cut from Glitter Black paper.
I die cut two layers with black card stock and one with the glittered paper and layered them upp for more depth.
I added the letters to a label that is die cut with a die from the Tasteful Labels dies.
I embossed the label before adding the letters with the Cobweb EF.

 
  Listed below are the "ingredients" used to make this project.
If you would like to buy the products for yourself,
 I would be very happy for you to shop with me.  
You can get to my online store by clicking on any of the thumbnail images below.
If you purchase from me be sure and use
my host code for November:
 
QVZAK26B

 
All orders 50.00 and over will receive a gift from me.
As always if your order is 150.00 or more don't use the hostess code, you will
still receive a gift from me.
 
 
This wraps up my Halloween week long shares on the blog. 
 
Be sure to head over to  Wendy's Blog 
to check out her 3-D item!
 
Thanks so much for stopping by! 
 
 
 Vicki

Friday, October 30, 2020

Kitty Boo Box

 
Happy Friday Peeps!!
 
Today is day 5 of my week of Halloween here on the blog.
 
Today I am sharing a cute little project I am calling my Kitty Boo Box.

This is a super simple treat holder.
I used one of the clear tiny treat boxes and made a little box to sit it in.

 
Here is a side view so you can see the box better than holds the tiny clear box.
 
I decorated my project using the Ghoulish Goodies stamp set.
 
 
The box ix made using Rich Razzleberry card stock and some DSP from the Magic in This Nigh pack.
 
I used the  Delightful Tag Topper Punch on the back of the box.

I stamped the cat image with Black Memento ink and colored in the collar and eyes using my Blends.
I die cut him with a circle stitched die from the Stitched Shapes Dies.
I matted the circle with a Rich Razzleberry scallop circle cut with the Layering Circle Dies.
Behind the kitty is a strip of Glitter black that I flagged the ends with the Banners Pick a Punch.

 
Both the sentiments used are from the Ghoulish Goodies set. The "for you" is die cut with a die from the Ornate Frames Die set.
 
I added a bow using the Glittered Organdy Ribbon.
 
   Listed below are the "ingredients" used to make this project.
If you would like to buy the products for yourself,
 I would be very happy for you to shop with me.  
You can get to my online store by clicking on any of the thumbnail images below.
If you purchase from me be sure and use
my host code for October:
 
6DGRTNHS

 
All orders 50.00 and over will receive a gift from me.
As always if your order is 150.00 or more don't use the hostess code, you will
still receive a gift from me.
Thanks so much for stopping by! 
 
 
 Vicki

Thursday, October 29, 2020

Halloween Goodies

 
 Happy Thursday Peeps!!!

It is day 4 of Halloween week here on the blog and I am sharing some fun little treats I made.

These were seriously fun to put together and I was inspired by my friend Wendy, she makes the absolutely BEST treats and I always want to make all the ones she post on her blog!


I used the Ghoulish Goodies and Have a Hoot stamp sets to make these treats that hold some
Hershey kisses. 
 
 I used the Celebration and Hippo and Friends Dies to make the toppers.

 
The Dracula treats are made using the Printed Gusseted Cello Bags from Stampin Up and the
Owl treats use a small ziplock baggies I had on hand.

 
  Listed below are the "ingredients" used to make this project.
If you would like to buy the products for yourself,
 I would be very happy for you to shop with me.  
You can get to my online store by clicking on any of the thumbnail images below.
If you purchase from me be sure and use
my host code for October:
 
6DGRTNHS

 
All orders 50.00 and over will receive a gift from me.
As always if your order is 150.00 or more don't use the hostess code, you will
still receive a gift from me.
Thanks so much for stopping by! 
 
 
 Vicki
 

Wednesday, October 28, 2020

Magic in this Night


Happy Wednesday Peeps!!!
 
It is day three of Halloween week and today I have card to share!
 
I had an extra rosette left from my project yesterday so I decided to add it to a card.
This is another "too thick to mail" card.

The base of my card is Pretty Peacock card stock.
I then used some DSP from the Magic in this Night pack that I layered with Basic Black card stock for my next two layers.
Another strip of the DSP is across the lower half of the card.
I used a die cut from the Halloween Magic Dies under the edge of the both sides of the strip of DSP before adding to the card.

 
Next up the rosette was added.
I then went about stamping the center for the rosette.
I stamped the sentiment using Pretty Peacock ink on Whisper White card stock and die cut it with a die from the Layering Circles Dies.
 
I stamped part of the image of another stamp from the Hallows Night Magic stamp set 
with Black Stazon ink.
I colored this little bit of the image with my water painter and ink pads.
 I used my Pretty Peacock and Old Olive ink pads.
I fussy cut it out and glued it to my die cut circle and trimmed it to fit part and extend over the circle in another area.
I used some Crumb Cake ink all around the cobweb image.
I then embossed my circle element using the Tasteful Textile EF.
I die cut a scallop circle using Black Glitter paper to add the sentiment piece to.

I looped some Black Glittered ribbon and glued to the rosette before adding the
sentiment circle piece to the rosette with dimensionals.

Final touches are a stamped spider, fussy cut out, and glued to the sentiment piece and a few iridescent Pearls added around the card and on the cut out spider.


 Listed below are the "ingredients" used to make this project.
If you would like to buy the products for yourself,
 I would be very happy for you to shop with me.  
You can get to my online store by clicking on any of the thumbnail images below.
If you purchase from me be sure and use
my host code for October:
 
6DGRTNHS

 
All orders 50.00 and over will receive a gift from me.
As always if your order is 150.00 or more don't use the hostess code, you will
still receive a gift from me.
Thanks so much for stopping by! 
 
 
 Vicki

Tuesday, October 27, 2020

Halloween Centerpiece


Happy Tuesday Peeps!!!
 
 Day 2 of Halloween week is here!
 
Today I am sharing a cute little centerpiece I made.
 
I used a few different sets for this.
 
I started with making my rosettes.
I cut strips of the Magic in this Night DSP. 
My strips were 1-1/2 inch by 12 and I cut 2 of three different patterns of the DSP. I scored these using the Simply Scored Scoring Tool at 1/2 inch apart all the way across. 
They were folded up and glued together to form a circle. I used my hot glue gun to glue these to 
a punched circle. 
The Rosettes are glued to wood skewers  that I painted black
 
 
The stamps I used are from the Ghoulish Goodies,  the Dracula and "good to the last bite".
I used the Banner Year set for the October 31 stamped with Cajun Craze.
I used The Magic in this Night set and stamped with Pretty Peacock.
The bats are die cut from the Magic in this Night DSP.

 
I used the Layering Circles Dies to cut out each image and matted them with a Scallop circle using the Black Glitter paper.
 
I also used the Metallic Mesh ribbon and Glittered Iridescent Pearls.
 
I used a small mason jar that I painted black as well.


Listed below are the "ingredients" used to make this project.
If you would like to buy the products for yourself,
 I would be very happy for you to shop with me.  
You can get to my online store by clicking on any of the thumbnail images below.
If you purchase from me be sure and use
my host code for October:
 
6DGRTNHS

 
All orders 50.00 and over will receive a gift from me.
As always if your order is 150.00 or more don't use the hostess code, you will
still receive a gift from me.
Thanks so much for stopping by! 
 
 
 Vicki


Monday, October 26, 2020

Happy Haunting


Happy Monday Peeps!!
 
It is Halloween week on the blog!
Every day this week I will have a Halloween themed item to share.

Today I have this cute little witch from Flight of Fancy to share.

Isn't she cute??!!
 
I stamped her with Black Memento ink on thick Whisper White and colored with
my Blends.
I used Highland Heather, Daffodil Delight, Petal Pink, Smokey Slate and Crumb Cake Blends.
 
 
The "Happy Haunting" comes from the Banner Year stamp set.
I die cut the witch panel with a die from the Celebration Labels Dies.
 
The base of the card is Gorgeous Grape and the DSP is from the Brights 6x6 pack.


Listed below are the "ingredients" used to make this project.
If you would like to buy the products for yourself,
 I would be very happy for you to shop with me.  
You can get to my online store by clicking on any of the thumbnail images below.
If you purchase from me be sure and use
my host code for October:
 
6DGRTNHS

 
All orders 50.00 and over will receive a gift from me.
As always if your order is 150.00 or more don't use the hostess code, you will
still receive a gift from me.
Thanks so much for stopping by! 
 
 
 Vicki

Friday, October 23, 2020

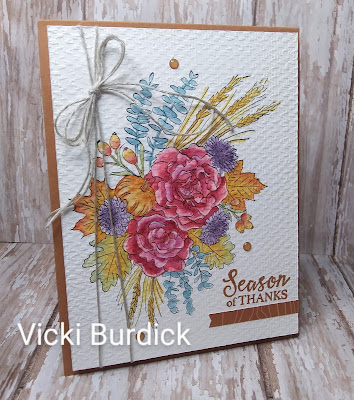
Season of Thanks

 
Happy Friday Peeps!! 

Sorry for the lack of posts this week but I have had quite a busy week!
I had a grueling week at work, this time of year it always get s a bit overwhelming.
I worked 5 days in a row and one of the days was a 9 hour day. Not my normal, I generally work only 2 or 3 days a week and only 5 hour shifts.

For the last couple of years I keep saying I am not going to do this again next year, I think this year will be my last.......lol! We will see.

On top of that we had to have a technician from the cable/internet company here twice this week.
 
Our internet went out on Saturday afternoon, guy came on Monday afternoon and worked a bit. Got it going and then it was out again on Wednesday. Another guy here and finally after replacing a splitter at the pole and the box on our house, it has been working.

Anyway enough of that, on to my card.
 
I colored this up on Sunday. I love this image from the Autumn Greetings stamp set.
 
I am going to link this to the challenge this week at Global Design Project,
which is a themed challenge:
 
I stamped the image with Black Stazon ink and water colored with my water brush and ink pads.


After coloring I embossed the panel with the Tasteful Textiles EF. 

I stamped the sentiment, from the Gather Together stamp set, using Cinnamon Cider ink.
I added a small strip of Cinnamon Cider DSP with a banner end under the sentiment.

I finished up with a wrap and bow with linen thread and few Cinnamon Cider enamel dots from the InColor pack.


Listed below are the "ingredients" used to make this project.
If you would like to buy the products for yourself,
 I would be very happy for you to shop with me.  
You can get to my online store by clicking on any of the thumbnail images below.
If you purchase from me be sure and use
my host code for October:
 
6DGRTNHS

 
All orders 50.00 and over will receive a gift from me.
As always if your order is 150.00 or more don't use the hostess code, you will
still receive a gift from me.
Thanks so much for stopping by! 
 
 
 Vicki

Tuesday, October 20, 2020

Happy Fall, Y'all

 
Happy Tuesday Peeps!!!
 
 
Today I am sharing another card made using the soon to be released Curvy Dies.
 
I am kinda obsessed with them.
This card uses only the dies, My sentiment, which I curved to fit, is from the Banner Year stamp set.
 
My "Fall" flowers are from the Tasteful Touches stamp set.
 
I stamped with Black Memento ink and colored with my Blends.
I used Mango Melody, Pumpkin Pie, and Daffodil Delight.
 
My leaves come from the Beautiful Autumn stamp set.
 
I colored them with my light and dark Old Olive Blend.
 
 
I used Bumble Bee card stock for my base and the DSP is from the In Color 6x6 pack.
 
I embossed using he Subtle EF on the white/DSP panel.
 
The flowers were added to the card with dimensionals.
I added some Gilded gems to finish it up!
 
 
Listed below are the "ingredients" used to make this project.
If you would like to buy the products for yourself,
 I would be very happy for you to shop with me.  
You can get to my online store by clicking on any of the thumbnail images below.
If you purchase from me be sure and use
my host code for October:
 
6DGRTNHS

 
All orders 50.00 and over will receive a gift from me.
As always if your order is 150.00 or more don't use the hostess code, you will
still receive a gift from me.
Thanks so much for stopping by! 
 
 
 Vicki
 

Saturday, October 17, 2020

Creative Challenge


Happy Saturday Peeps!!!
 
It is time for another  3D Creative Challenge with my friend Wendy at .WeeBeeStampin4Fun.
 
I have a fun little Pumpkin Cart treat Holder to share for my challenge item.
 
I had so much fun making my little Pumpkin Cart.

The cart is made of a box measuring 2 x 3 inches.
I started with a 4x5 inch piece of Pumpkin Pie card stock and scored a 1 inch on all 4 sides.
Super simple.
 I embossed the cardstock piece after scoring with the Tasteful Textiles EF.
I added a small strip around the top of Crumb Cake.
I sponged the edges of all the card sock with coordinating ink color. I used Early Espresso ink on the Crumb Cake and Pumpkin Pie on the Pumpkin pie card stock.
 
 
The wheels are made up of three size circles two are punches and one is from the Layering Circle Dies.

I used Basic Black and Crumb Cake for them,

I just winged it on making the handle, just a small strip of card stock with another square piece of cardstock folded in half and glued to the end. I rounded the top corners a bit and then sponged it all.

The die cut pumpkins come from the  Autumn Essential Dies. I used Pumpkin Pie and for the middle one I used a piece of Bumble Bee DSP from the In Color pack.
I glued the pumpkins to the inside edge of the cart.

The sentiment on the cart comes from the Harvest Hellos stamp set.

I added a bag of pumpkins tied it up with a pretty bow and added the "Happy Fall Y'all" tag.


Be sure to head over to Wendy's Blog 
to see her 3D project!! It is sure to WOW!! 
 
 
Listed below are the "ingredients" used to make this project.
If you would like to buy the products for yourself,
 I would be very happy for you to shop with me.  
You can get to my online store by clicking on any of the thumbnail images below.
If you purchase from me be sure and use
my host code for October:
 
6DGRTNHS

 
All orders 50.00 and over will receive a gift from me.
As always if your order is 150.00 or more don't use the hostess code, you will
still receive a gift from me.
Thanks so much for stopping by! 
 
 
 Vicki

Friday, October 16, 2020

Warm & Toasty

 
Happy Friday Peeps!!
 
Today I am sharing a card I made using the sketch this week at  
 

I used the cute Warm &Toasty  stamp set for the adorable little deer and also the new Curvy dies and Classic Christmas 6 x 6 DSP pack.

I stamped the deer with Black Memento ink on Whisper White card stock and colored with my Blends.
The Blends I used are Ivory, Crumb Cake, light and dark, Real Red and Cherry Cobbler, boh ligh and dark, Smoky Slate, light and dark, light Flirty Flamingo, just a touch in the ears, and Daffodil Delight.
The Color Lifter was also utilized. 
I used my white gel pen to add a few highlights and covered the whole image using my Wink of Stella pen.
 I fussy cut this out to use on my card.
 
 
The base of my card is Crumb Cake card stock.
I followed the sketch using  CherryCobbler card stock and then a layer of the DSP from the Classic Christmas pack that I matted with whisper white.

The sentiment panel is made with the new Curvy Dies. I am so happy with these dies and have hoped for one similar to this one for a long time. I have to admit it took me a minute to figure out how to cut both sides of the panel, but once I did I had to laugh.....sometimes I make things harder than need be! 

The sentiment comes from the Warm & Toasty set and I stamped it with Cherry Cobbler ink.

The deer was added with dimensionals.
 I used some retired Snowflake Sequins I had in my stash.

 
Listed below are the "ingredients" used to make this project.
If you would like to buy the products for yourself,
 I would be very happy for you to shop with me.  
You can get to my online store by clicking on any of the thumbnail images below.
If you purchase from me be sure and use
my host code for October:
 
6DGRTNHS

 
All orders 50.00 and over will receive a gift from me.
As always if your order is 150.00 or more don't use the hostess code, you will
still receive a gift from me.
Thanks so much for stopping by! 
 
 
 Vicki 

Thursday, October 15, 2020

Curvy Christmas

 
Happy Thursday Peeps!!
 
Today I am sharing a card I made using some of a new bundle of products called Curvy Celebrations.
 
I used on this card one of the Curvy Dies and my sentiment is from the Curvy Christmas stamp set.
 
This bundle of products will be available for customer purchase Nov. 3rd.
This is an early release product from the January - June 2021 mini catalog.
 The bundle includes the dies, two stamp sets and a pack of 6 x 6 DSP.
I love the new DSP and will have another card to share with you using some of it soon.
 
On my card today, I used the Curvy Die and Curvy Christmas sentiment with my Poinsettia Petals stamp set and DSP from the Poinsettia Place pack.
 
 
I stamped each layer of the flower twice on thick Whisper White with Black Stazon Ink.
I colored using my Water Brush and ink pads. I used Real Red and Cherry Cobbler.
For the leaves I did the same and colored with Garden Green. 
The berries are also done in the same manner and colored with Real Red and Cherry Cobbler.
I fussy cut out my flower and leaves as I did not want a white edge around them. I did use the dies for my berries and center of the poinsettia.

I stamped the sentiment using Early Espresso ink onto the Crumb Cake curved piece.
The poinsettia is added to the card with dimensionals.
The leaves and berries are tucked in and around the poinsettia and then glued down.

 
I finished up by using my Wink of Stella on the Poinsettia and leaves and then added a few
 Gilded Gems. 
 

Listed below are the "ingredients" used to make this project.
If you would like to buy the products for yourself,
 I would be very happy for you to shop with me.  
You can get to my online store by clicking on any of the thumbnail images below.
If you purchase from me be sure and use
my host code for October:
 
6DGRTNHS

 
All orders 50.00 and over will receive a gift from me.
As always if your order is 150.00 or more don't use the hostess code, you will
still receive a gift from me.
Thanks so much for stopping by! 
 
 
 Vicki